culinary flights of fancy

Home Cooking Adventures in Berkeley Heights


17 Comments

Braised Lamb Shanks in Red Wine and Veal Stock with Vegetables and Mixed Herbs

Lamb.Braised.1

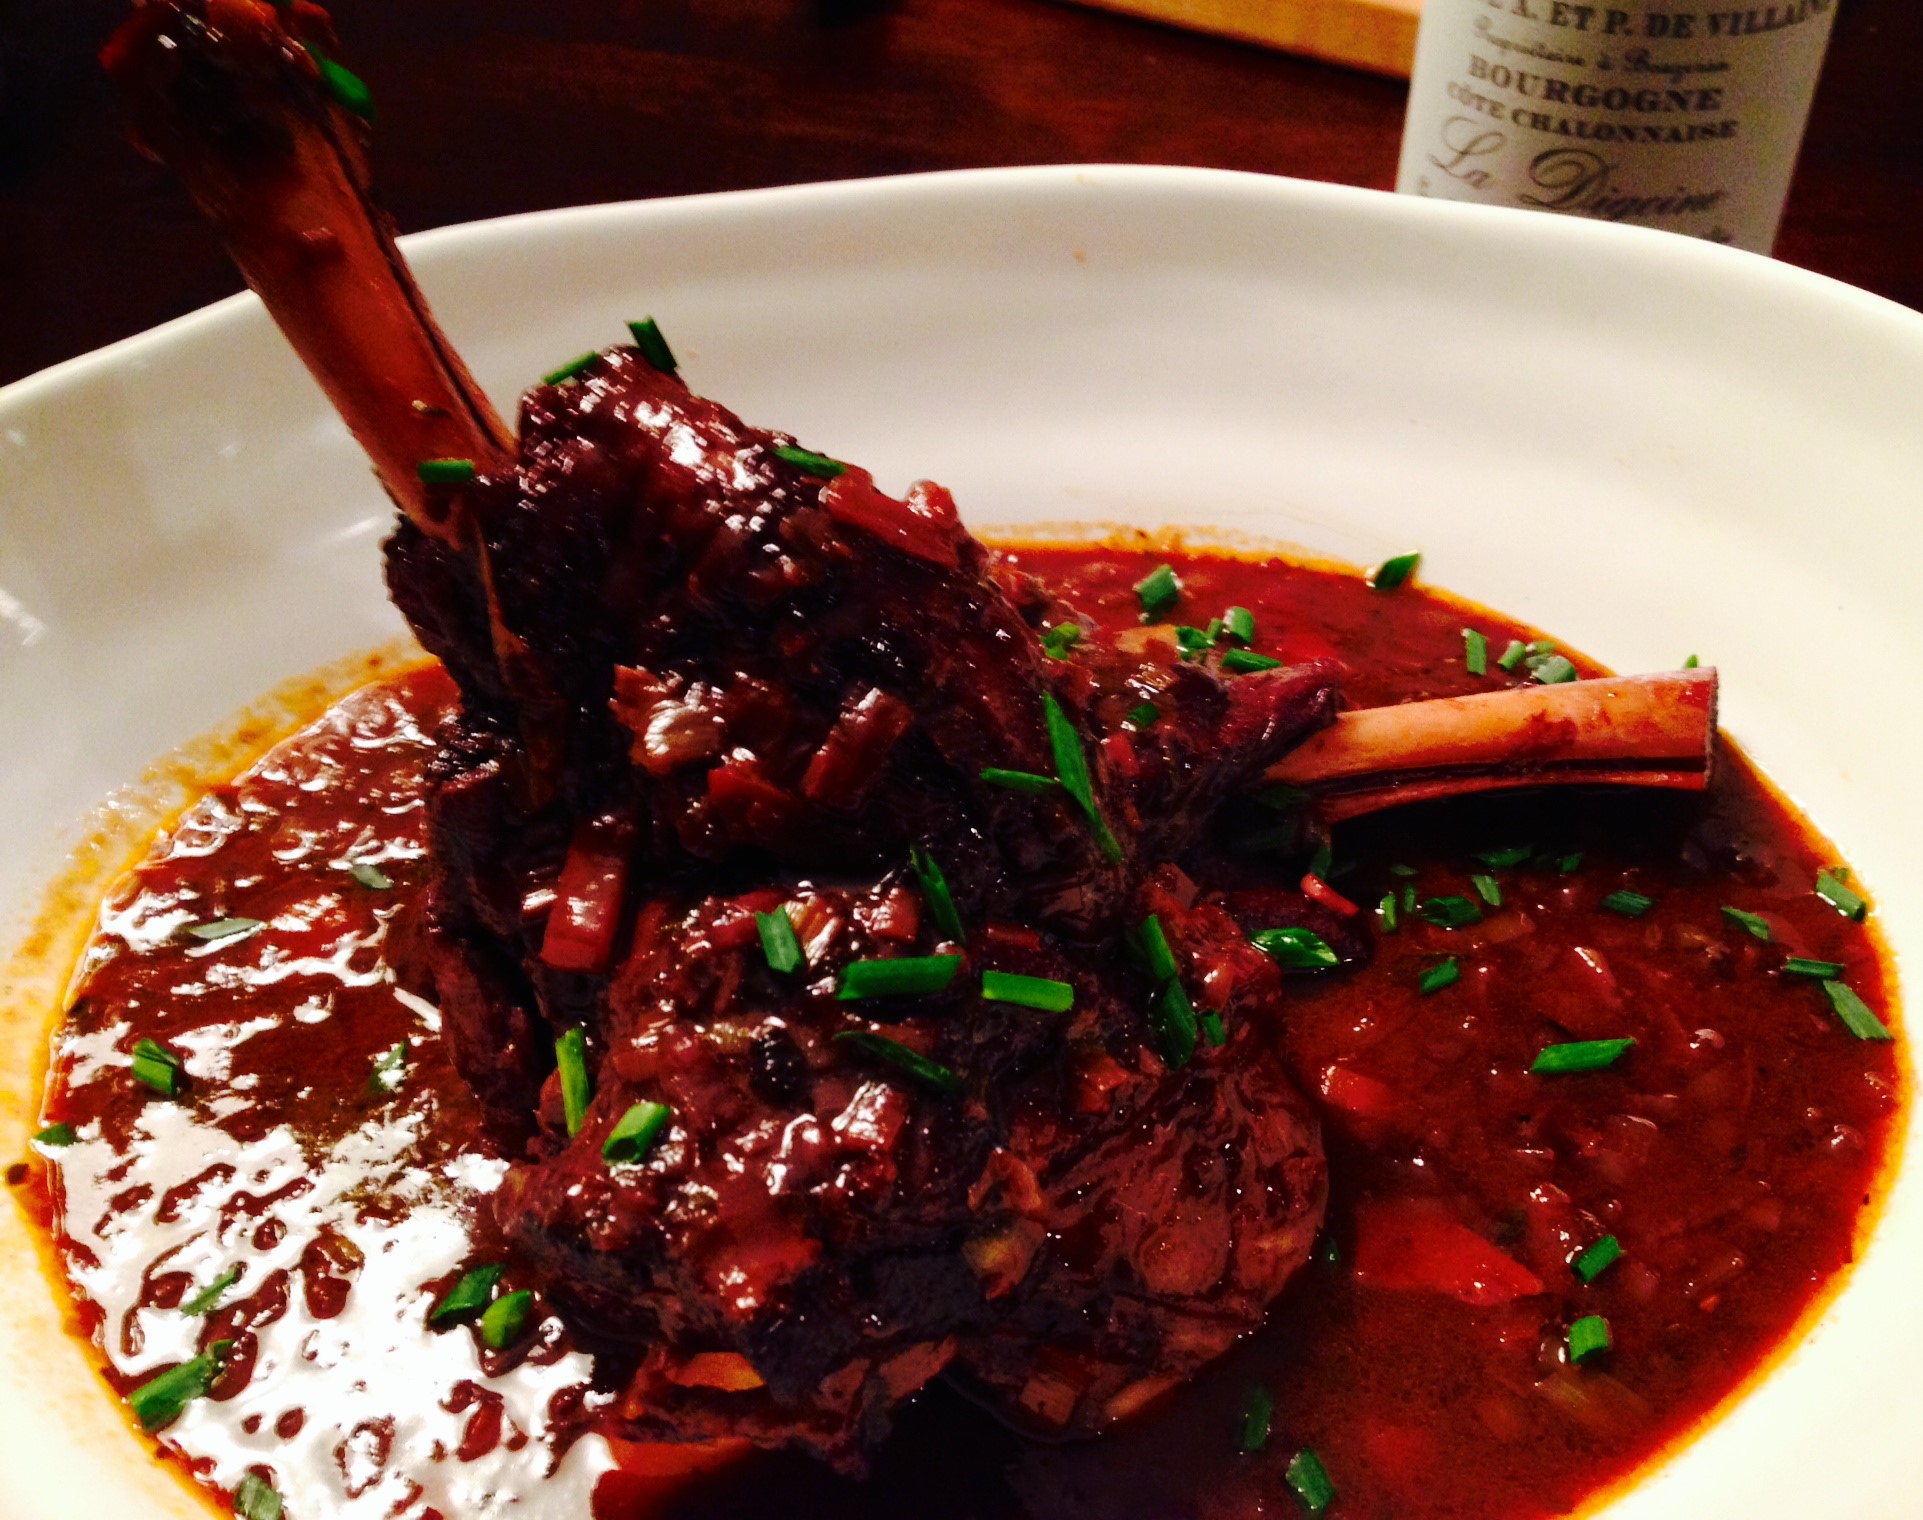
My wife asked me to make lamb for her birthday recently, so I gave it some thought and decided to make lamb shanks. Lamb shanks are great braised and the slow cooking in a sauce is a perfect complement to the coming colder weather. Here, I used a red wine and homemade veal stock as the braising liquid and complemented that with an assortment of herbs and vegetables. Braising takes a while to do…hours really. However, it’s a great thing to do on a leisurely weekend where you have a few hours. Once you sear the meat and brown the vegetables, the rest of the work is done with the pot covered and simply allowing it to simmer away until the meat becomes tender and the liquid thickened and reduced. I served the lamb shanks over a puree of cauliflower (my wife’s request and it was great) and a quick sauté of some kale. However, you can certainly serve this with polenta, pasta, mashed potatoes or a root vegetable mash. Grains would be great here too. Really, anything that can stand up to a strong, thick liquid would be perfect.

Browning/searing process of the meat and the vegetables is key for a great braised dish. It’s really in those two steps that a large amount of the flavor of the dish is developed. So, don’t skimp on these steps. Take your time here and the entire dish will definitely benefit from the effort.

I used wine and stock as my braising liquids. If you don’t have homemade stock, no need to go buy some. Simply use the wine and add a bit of water to make up the difference. You’ll be better off using something pure like water than using the chemical laden stocks that are sold in the grocery stores. If you don’t have wine, beer braising works too. Really you can let your imagination run wild with this. Traditionally, however, wine and stock are it…and I’d certainly recommend it as a starting point.  Recipe follows after the jump… Continue reading


3 Comments

Family Pizza Night

Veggie Pizza with farm fresh mushrooms, Tuscan kale, onions, red bell peppers, and fresh ricotta and mozzarella cheeses.  Garnished with sea salt, red pepper flakes, and a drizzle of olive oil.

Veggie Pizza with farm fresh mushrooms, Tuscan kale, onions, red bell peppers, and fresh ricotta and mozzarella cheeses. Garnished with sea salt, red pepper flakes, and a drizzle of olive oil.

Pizza.Sausage.4

Over the holiday a couple weeks back, we decided to stay put and not go anywhere. It was very low key, which gave me time to cook. One night I made the mussels, which I discuss in a previous post, and on another night we had homemade pizza. When I say homemade pizza, I mean homemade pizza. I made everything from mozzarella and ricotta cheese to the dough for the crust to literally grinding and seasoning meat to make Italian sausage. It was a whole production that took the better part of the day (off and on). I know most people probably don’t want to spend that amount of time in the kitchen but it really was an off and on sort of day, casually doing one thing and then another later and so on until the components were ready for the actual pizza making. Personally I think this can end up being a family sort of activity where you can get kids involved in each facet of the process or allow them at the end to put the pizza together using ingredients of their choice.

I used the red sauce that I posted about a few days back and simply reduced that down further until it was very thick (pizza sauce needs to be much thicker than a tomato sauce that you would use for pasta or something like that). I used a dough recipe from a recipe from Mark Bittman which I found by simply goggling pizza dough recipes. I thought it sounded good so that’s the one I landed on this time around. The mozzarella cheese recipe I used was from a cookbook entitled Home Cheese Making by Ricki Carroll (which is a great beginner’s guide to making fresh and aged cheeses). I posted a recipe for the ricotta a while back and it’s very easy. I purchased a pork shoulder from Barth’s market and ground it using a medium grind. If you don’t have a meat grinder or meat grinder attachment for your stand mixer, you can certainly use ground pork instead. The ground meat was seasoned using only a few ingredients and I didn’t bother putting in cases…simply sautéed some small patties until they were almost cooked through and then finished the small sausage patties in the oven on the pizzas. From there, I chopped some fresh veggies such as mushrooms, onions, peppers, and garlic and chopped some herbs such as parsley and basil. We then had the components necessary to create a number of different pizzas. We ended up making a couple with sausage and a couple of vegetarian, which was great.

All of this sounds like a lot of work and it certainly isn’t the easiest of meals to make…but it’s pizza night and it can be fun if you have the right mind set. So decide on the ingredients you’d like to have as toppings, make the dough and sauce. If you don’t feel like making cheese, buy some fresh mozzarella and ricotta if you’d like and go from there. It can be as easy or as complex as you’d care to make it. Once you have the ingredients ready to assemble, the pizza making can go rather quickly…ten to twenty minutes per pizza depending on the size of the pizza and the temperature of the oven or grill you are using. Oh I almost forgot…if you have a pizza stone, you obviously need to use it. If you don’t but you think you might make this more than once it’s certainly worth the investment as you can usually purchase one for around $20. The recipes for the various components and the final pizzas follow after the jump…enjoy pizza night with your family. I think you will find that it’s a fun and enjoyably delicious experience. Continue reading


Leave a comment

Roasted Butternut Squash with Spiced Maple Glaze and Fresh Sage

ButternutSquash.1

Whether you are excited about the change to the fall season or lamenting the passing of summer, we are definitely headed into the fall produce season. If you go to farmer’s markets, you will start to notice the arrival of various types of apples and pears and things like winter squash. One of my wife’s favorite varieties of winter squash is the butternut variety and as such, I try to make it fairly often in the fall moving into the winter season.

This dish is very simple, combining several fall ingredients with one of the ultimate fall cooking methods, roasting. The dish takes about 40 minutes to make and only contains a handful of ingredients but the flavors end up really making this dish sing.  Recipe follows after the jump… Continue reading


Leave a comment

Mussels with White Wine, Pancetta, Shallot, and Herbs

Mussels.1

Last weekend my wife asked me to make mussels. I think I hadn’t made them since culinary school years ago so I thought that sounded like an easy and interesting idea. I decided to make them as an appetizer while we watched some college football and I made a roasted chicken that I allowed to sit until it hit room temperature for dinner…super easy and pretty much a low key meal. I made some crusty whole wheat and rye bread to go along with the mussels and cut some raw vegetables to go with the chicken. That sounds like a lot and let me just say that it definitely was! We didn’t make it to the chicken so we had it leftover on salads later.

At any rate, the mussels ended up being the star of the show. I went to Barth’s market and bought some…which they sell in packs that weigh somewhere around two pounds. I didn’t really know how many pounds to buy so I googled it and the suggested serving size is around one pound per person so that was perfect. As it also turns out, one pound per person is a very healthy serving so if you are going to make mussels as part of a multi-course meal, you can definitely scale that back. To my surprise, the mussels were quite reasonable as well, around $2.99 per pound. We may be enjoying mussels more often…

We had some white wine open so I used it to steam the mussels. First though, I sweated a bit of pancetta to render out some fat, then cooked a bit of shallot in that. From there, you add the mussels and a splash of wine or some other liquid and a few minutes later they are completely finished. Once I got to the actual cooking the whole production took less than ten minutes to complete.

A quick note before we get to the recipe…mussels are sold while alive and spoil relatively easily so I suggest purchasing them on the day you actually use them. I stored mine in the mesh bag they came in and simply placed the bag on a bed of ice and left them in the refrigerator until I was ready to begin. To prepare them, you have to do just a couple of things. Prior to cooking, you need to go through each and every mussel to inspect them, looking for two things. First, you look to make sure they are completely closed. If they are not, squeeze them and if they stay shut after the squeeze then it’s safe to continue. If it stays open, it needs to be discarded. After that, you look for a stringy thing slightly hanging out of the shell, which is called a beard. If you see it or feel it on the shell, pull it out. Once you do those two things the mussels are ready to roll…pretty easy and it goes a lot more quickly than it perhaps sounds.  Recipe follows after the jump. Continue reading


2 Comments

Tomato Sauce Using Fresh Jersey Tomatoes

Marinara.Jersey.1

This is another post about preserving summer produce, this time with tomatoes. Tomatoes, like peaches, will be around for a few more weeks so now is the time to make tomato sauce. I place my tomato sauce in quart containers and freeze it. However you can certainly preserve the sauce in jars using a canner too.

I know a there are a lot of people from Berkeley Heights and the surrounding communities who are steeped in the Italian-American tradition of making tomato or red sauce. I also am aware that people have very strong opinions regarding what exactly goes in a classic red tomato sauce. I’ve tried making tomato sauce a number of times in a number of different ways but I really like this recipe for making tomato sauce from fresh tomatoes. It’s very basic and pretty easy, though a bit time consuming.

I skin the tomatoes, chop them, and slow cook them with garlic, olive oil, and a splash of white wine. I add a touch of red pepper flake but you can certainly omit that if you prefer. I add fresh basil at the very end. Otherwise I try to keep this base sauce very neutral so that I can adjust it later when I use it in other dishes. However, as is, this is a great red sauce to use for marinara or other pasta dishes. I used it while making pizza the other night and it made a wonderful base. In fact, I liked it so much I went and bought more tomatoes and made another large batch.

I used about 10 pound of tomatoes, which I purchased from Vito’s produce in Berkeley Heights. You can scale this way up or way down depending on your needs. Just realize that although ten pounds of tomatoes sounds like quite a bit, they cook down and reduce significantly. So, ten pounds of tomatoes yielded about 2 quarts of actual sauce. Also regardless of how much you make, it will still take a decent amount of time…so, you may as well make a bunch. It freezes very well!  Recipe follows after the jump… Continue reading


1 Comment

Peach Butter from New Jersey Peaches

PeachButter.1

Peaches.1

Peach season is almost over. It’s time to preserve one of New Jersey’s great summer products. There are a ton of different ways to accomplish that goal but one of the ways that I preserved this great summer treat was to make a big batch of peach butter. This was an event for me. I went to Chester, NJ and picked the peaches that I used at Alstede Farms. I started with about twenty pounds of peaches…which granted, is quite a bit. I then chopped the peaches up, blended them, seasoned and cooked them until very thick.

Never heard of peach butter? It’s just like apple butter and made the exact same way. It takes a bit of time but it really is very simple to make. I made mine with just a handful of ingredients and kept it a bit chunky rather than the traditionally smooth texture that you find in most markets.  One of the things I like about making peach butter myself is that I can control the sweetness.  Peaches are quite sweet on their own.  I used honey instead of regular sugar and didn’t use a whole lot at that…I used about a quarter of a cup of honey for the entire 20 pounds of peaches.  Feel free to adjust the sugar amounts as you’d like and you can certainly use regular sugar instead of honey.

I preserved my peach butter using a canner and this recipe makes about 10 pints. So, feel free to scale the recipe up or down based on the yield amounts you’d prefer. I’m new to canning so I’m not going to provide details on how to can…I’m just not comfortable with that yet. However, it’s very easy to find instructions if you care to do that. All it takes is a simple google search and you’ll be well on your way. If you don’t can the peach butter, it will last at least a couple weeks in the refrigerator.  Recipe follows after the jump. Continue reading